
Stanford Pupper v3
A 12-DoF teaching robot dog from the Stanford Pupper line, on brushless GIM4305 actuators and a Raspberry Pi 5 with an RL walking policy; documented by Hands-On Robotics.
- $2,000self-sourced build, the docs' estimate, estimate
- 12 DoF
- No license filehardware
- 73 / 100 reproducibilityPartial source coverage, unverified
What it is
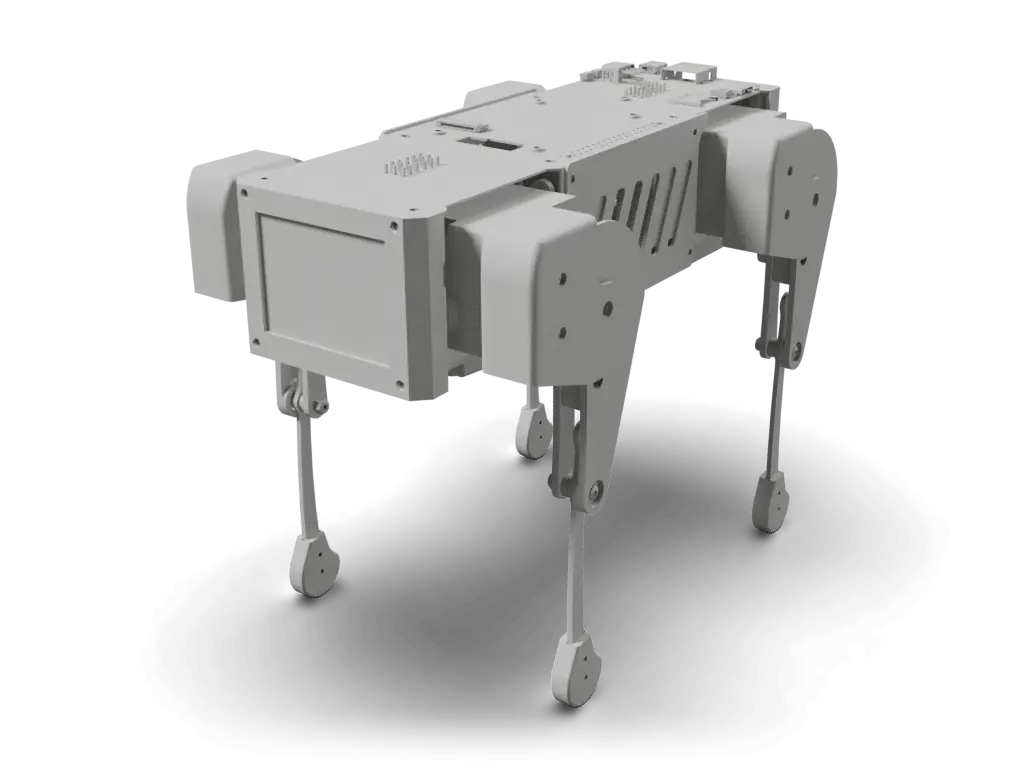
Pupper v3 is a robot dog designed to teach robotics and AI, with a curriculum developed over years of Stanford course instruction; Hands-On Robotics publishes its documentation, and the Stanford Doggo authors named it as their next robot when they ended support for Doggo. It has 12 degrees of freedom, three per leg, driven by Steadywin GIM4305 brushless actuators with 10:1 planetary gearboxes, a Raspberry Pi 5 with an M.2 slot for an AI accelerator, a BNO086 IMU, a fisheye camera in the nose, a 4-inch face screen, a speaker and ear servos, and weighs about 3 kg. It walks with a reinforcement learning policy trained in simulation. The docs say everything is open source and estimate about 2,000 USD to build one; they link a BOM sheet with print settings and a Drive STL for every printed part, Gerber, BOM and placement files for the control and power boards, an 80-slide illustrated build guide, a Fusion 360 model (an Onshape link in the docs did not open anonymously), and the control board firmware. The software monorepo (GPL-3.0) holds the ROS 2 stack and the MuJoCo and URDF models (MIT); the docs are AGPL-3.0, and no license is stated for the hardware. Kits are sold by Present Perfection and AIFitLab. The 3D view is the project's MuJoCo model, a simulation model.
Licenses
- Hardware
- No license file
- Software
- GPL-3.0
- Docs
- AGPL-3.0
Degrees of freedom
12 DoF legs 12
Quadrupedsource
Auto-assembled, not yet reviewed
Source record
- Sources
- 10 stars, last push 2025-10-20
- HW license
- No license file
- Cost
- $2,000estimate, self-sourced build, the docs' estimate
- Lifecycle
- Active
- Engine
- v3.1.1
- Checked
- Model
- pupper_v3_complete.xml@6f96c5ethe project's simulation model in Nate711/pupperv3-monorepo, not its build CADrendered 2026-10-02
- Envelope
- 243 × 259 × 321 mmas in the simulation model, default pose
Maintain Stanford Pupper v3? Claim this page to correct it.
Parts and cost
Cost to build
- self-sourced build, the docs' estimate
- Pupper V3 Full Kit from Present Perfection, the kit builder the docs name
In the source currency, as read on 2026-10-02. Not converted, and not checked against current vendor prices: none of these is a Motari-verified checkout total.
Stanford Pupper v3 parts, as the source lists them. Prices are the source's, not checked against vendors.
| Part | Qty | Spec | Source | Confidence |
|---|---|---|---|---|
M2.5x25 socket headListed under Stand; the build slides use four to fix the control board to the brain bracket | 4 | M2.5x25 socket head | McMaster-Carr4 approx. line total (currency not stated)Pupper v3 BOM Google Sheet, tab v3.5 | high |
PETG HF 1.75mm for structureFilament for the printed parts | 1 | PETG HF 1.75mm for structure | Bambu Lab20 approx. line total (currency not stated)Pupper v3 BOM Google Sheet, tab v3.5 | high |
M2.5x10 socket headMain assembly screw | 100 | M2.5x10 socket head | McMaster-Carr7 approx. line total (currency not stated)Pupper v3 BOM Google Sheet, tab v3.5 | high |
M2.5 heat-set tapered threaded insertSet into the printed parts with a soldering iron | 100 | M2.5 heat-set tapered threaded insert | McMaster-Carr17 approx. line total (currency not stated)Pupper v3 BOM Google Sheet, tab v3.5 | high |
M3x8 cap headLeg and bracket screws | 50 | M3x8 cap head | McMaster-Carr4 approx. line total (currency not stated)Pupper v3 BOM Google Sheet, tab v3.5 | high |
Squash ball single or double yellow dotGlued to the lower legs as feet | 4 | Squash ball single or double yellow dot | Amazon15 approx. line total (currency not stated)Pupper v3 BOM Google Sheet, tab v3.5 | high |
4x4in Waveshare HDMI Raspberry Pi screenFace and debug screen | 1 | 4x4in Waveshare HDMI Raspberry Pi screen | Amazon75.99 approx. line total (currency not stated)Pupper v3 BOM Google Sheet, tab v3.5 | high |
Rasberry Pi 5 8gbMain computer | 1 | Rasberry Pi 5 8gb | Digi-Key80 approx. line total (currency not stated)Pupper v3 BOM Google Sheet, tab v3.5 | high |
USB Flash drive 128 gbBoot drive for the Pupper OS image | 1 | USB Flash drive 128 gb | Amazon14 approx. line total (currency not stated)Pupper v3 BOM Google Sheet, tab v3.5 | high |
2x20 female header extensionRaises the control board on the Pi header | 1 | 2x20 female header extension | Adafruit2.5 approx. line total (currency not stated)Pupper v3 BOM Google Sheet, tab v3.5 | high |
Pi hat control boardCustom board; requires a BNO086 IMU; firmware SPIneV1 | 1 | Pi hat control board | PCB files: Control Board Rev 3.560 approx. line total (currency not stated)Pupper v3 BOM Google Sheet, tab v3.5 | high |
[Optional] AI kitOptional in the sheet; the build slides fit its accelerator | 1 | AI kit | CanaKit70 approx. line total (currency not stated)Pupper v3 BOM Google Sheet, tab v3.5 | high |
[Optional] M.2 adapter board for AI kitOptional in the sheet | 1 | M.2 adapter board for AI kit | Waveshare13 approx. line total (currency not stated)Pupper v3 BOM Google Sheet, tab v3.5 | high |
[Optional] Arducam IMX296Optional in the sheet; the nose camera | 1 | Arducam IMX296 | Amazon62 approx. line total (currency not stated)Pupper v3 BOM Google Sheet, tab v3.5 | high |
[Optional] Fisheye lensOptional in the sheet | 1 | Fisheye lens | UCTRONICS15 approx. line total (currency not stated)Pupper v3 BOM Google Sheet, tab v3.5 | high |
[Optional] Lens holderOptional in the sheet | 1 | Lens holder | UCTRONICS3 approx. line total (currency not stated)Pupper v3 BOM Google Sheet, tab v3.5 | high |
[Optional] Wireless lapel microphone usbOptional in the sheet | 1 | Wireless lapel microphone usb | Amazon12 approx. line total (currency not stated)Pupper v3 BOM Google Sheet, tab v3.5 | high |
[Optional] SpeakerOptional in the sheet | 1 | Speaker | Adafruit4 approx. line total (currency not stated)Pupper v3 BOM Google Sheet, tab v3.5 | high |
Power distribution boardCustom board | 1 | Power distribution board | PCB files: Power Board Rev 3.515 approx. line total (currency not stated)Pupper v3 BOM Google Sheet, tab v3.5 | high |
Tabs for distribution boardBattery connector tabs | 2 | Tabs for distribution board | Digi-Key0.42 approx. line total (currency not stated)Pupper v3 BOM Google Sheet, tab v3.5 | high |
| 2 | Dewalt 20V powerstack battery 1.7Ah | Amazon100 approx. line total (currency not stated)Pupper v3 BOM Google Sheet, tab v3.5 | high | |
PS5 Wireless ControllerGamepad | 1 | PS5 Wireless Controller | Amazon75 approx. line total (currency not stated)Pupper v3 BOM Google Sheet, tab v3.5 | high |
[Optional] Ear servosOptional in the sheet | 2 | Ear servos | Adafruit12 approx. line total (currency not stated)Pupper v3 BOM Google Sheet, tab v3.5 | high |
Steadywin GIM4305 with SHS driverThe sheet says to select the Pupper v3 version, or flash and configure the drivers yourself | 12 | Steadywin GIM4305 with SHS driver | AIFitLab1320 approx. line total (currency not stated)Pupper v3 BOM Google Sheet, tab v3.5 | high |
12" JST ZH pre-crimped cableFor the ID 3 knee motors | 24 | 12" JST ZH pre-crimped cable | Digi-Keyprice not listedPupper v3 BOM Google Sheet, tab v3.5 | high |
8" JST ZH pre-crimped cableFor the ID 2 abduction and adduction motors | 24 | 8" JST ZH pre-crimped cable | Digi-Keyprice not listedPupper v3 BOM Google Sheet, tab v3.5 | high |
6" JST ZH pre-crimped cableFor the ID 1 hip motors | 34 | 6" JST ZH pre-crimped cable | Digi-Keyprice not listedPupper v3 BOM Google Sheet, tab v3.5 | high |
6pin JST ZH housingCable housings | 24 | 6pin JST ZH housing | Digi-Keyprice not listedPupper v3 BOM Google Sheet, tab v3.5 | high |
10pin JST ZH cableControl board to power board | 1 | 10pin JST ZH cable | Amazonprice not listedPupper v3 BOM Google Sheet, tab v3.5 | high |
10mm cable wrap braided sleevingCut into leg cable segments | 12 | 10mm cable wrap braided sleeving | not linkedprice not listedPupper v3 BOM Google Sheet, tab v3.5 | high |
Rows from the source's own parts list 31
Pupper v3 BOM sheet, v3.5 tabgoogle_sheet
| Source row | Qty | Price and vendor | Line |
|---|---|---|---|
M2.5x25 socket head | 4 | McMaster-Carr4 (currency not stated) | L23 |
PETG HF 1.75mm for structure | 1 | Bambu Lab20 (currency not stated) | L27 |
M2.5x10 socket head | 100 | McMaster-Carr7 (currency not stated) | L28 |
M2.5 heat-set tapered threaded insert | 100 | McMaster-Carr17 (currency not stated) | L29 |
M3x8 cap head | 50 | McMaster-Carr4 (currency not stated) | L30 |
Squash ball single or double yellow dot | 4 | Amazon15 (currency not stated) | L31 |
4x4in Waveshare HDMI Raspberry Pi screen | 1 | Amazon75.99 (currency not stated) | L36 |
Rasberry Pi 5 8gb | 1 | Digi-Key80 (currency not stated) | L37 |
23 more rows in Pupper v3 BOM sheet, v3.5 tab
How to build
Upstream step marks a step taken from the linked guide.
Buy and print the parts
Order the parts on the v3.5 BOM sheet, including twelve Steadywin GIM4305 actuators with SHS drivers (the Pupper v3 version), a Raspberry Pi 5, the two custom boards and two DeWalt 20V batteries, and print the body, leg, bracket and ear parts in PETG (the strap in TPU) with the settings the sheet gives for each part.
Upstream stepdocs.google.com/spreadsheets/d/1e6Hyhc8V6_9mfPMaPCI1v3W4uGBJ...Flash the boards
Flash and configure the motor drivers with the Pupper firmware and settings (motor driver flashing instructions), then flash the control board with the Pupper firmware.
Upstream stepgithub.com/HandsOnRobotics/pupper-v3-documentation/blob/c25c...Prepare the hardware
Use a soldering iron at 250 C to set the threaded inserts into the printed parts, glue squash balls to the lower legs with super glue, and replace the camera's lens holder with the short lens holder and fisheye lens, focusing it on the Raspberry Pi 5 with rpicam-hello if needed.
Upstream stepgithub.com/HandsOnRobotics/pupper-v3-documentation/blob/c25c...Build the brain
Fit the thermal pads and the M.2 adapter board on the Raspberry Pi 5, move the AI accelerator into the adapter's M.2 slot, press on the header extension, connect the HDMI screen and the camera cable, then mount the camera on the brain bracket, the bracket on the Pi and the control board on the bracket with four M2.5x25 screws so its pogo pins meet the Pi's pins. Add the speaker and the USB stick.
Upstream stepdocs.google.com/presentation/d/10pe-J3zd4QESnqR-5TIyVrtoOJ6w...Test the brain
Power the Raspberry Pi from a 5V USB-C supply and wait for the PiOS desktop. With a mouse and keyboard, stop the robot service, check the camera with rpicam-hello, the accelerator with lspci and the speaker with speaker-test.
Upstream stepdocs.google.com/presentation/d/10pe-J3zd4QESnqR-5TIyVrtoOJ6w...Assemble the body
Fix the ear servos to the upper body, mount the brain and plug the servos into the L and R connectors, wire the 10-pin cable between the power distribution board and the control board, mount the power board with its two top screws, connect the two front hip motors with the 6-inch cable and screw them in with the cables toward the control board, then fit the cover, the bottom body and the knob.
Upstream stepdocs.google.com/presentation/d/10pe-J3zd4QESnqR-5TIyVrtoOJ6w...Power-test the body
Insert the battery into the power board until it clicks; it must not stick out past the bottom of the body. Press the power button: the screen should turn on and the front two motors rotate slowly. If not, check the battery and the USB drive flashing and motor settings. Press the button again to turn the robot off.
Upstream stepdocs.google.com/presentation/d/10pe-J3zd4QESnqR-5TIyVrtoOJ6w...Build the legs
Connect the 12-inch cable to motor ID 3 and the 8-inch cable to motor ID 2, sleeve flush with the motor and pin 1 to pin 1. Fix the lower leg to motor 3 with three M3x8 screws and the upper leg over it, remove the motor screw that blocks the upper leg, fasten it with M2.5x10 screws, and close the cable cover with four more. Build four legs.
Upstream stepdocs.google.com/presentation/d/10pe-J3zd4QESnqR-5TIyVrtoOJ6w...Attach the front legs
Fix the abduction bracket with three M3x8 screws, route motor 2's cable under the bracket's block, remove the motor screw that blocks the bracket and fasten motor 2 from both sides, then attach the leg to motor 2 with three M3x8 screws. Route both cables through the side hole into the tan connectors, and before tightening the front cable clamp rotate the abduction bracket to each stop so the hip moves fully without pulling the wires.
Upstream stepdocs.google.com/presentation/d/10pe-J3zd4QESnqR-5TIyVrtoOJ6w...Attach the back legs
Connect the 6-inch cable to motor 1, fix motor 1 to the body with two M2.5x10 screws and plug it into the power board, then add the abduction bracket, motor 2 and the leg as for the front legs, left to left and right to right. Plug the motor 2 and 3 cables into the power board and set the back cable clamp the same way.
Upstream stepdocs.google.com/presentation/d/10pe-J3zd4QESnqR-5TIyVrtoOJ6w...Close the body
Screw the strap to the power board cover, fix the cover with six M2.5x10 screws and the bottom body with four on each side, slide the joint cover bracket into place and attach the ears to the ear servos.
Upstream stepdocs.google.com/presentation/d/10pe-J3zd4QESnqR-5TIyVrtoOJ6w...Install the OS
Flash the full pupOS image to the USB drive with Raspberry Pi Imager 1.8.5 (not Balena Etcher), set the hostname to pupper and the username to pi, enable SSH, then plug the drive into a blue USB 3 port and pair the PS5 controller.
Upstream stepgithub.com/HandsOnRobotics/pupper-v3-documentation/blob/c25c...Run Pupper
Slide in the DeWalt battery until the latch locks, power on with the switch on the back and let the calibration finish (the legs move to their endstops, then rest). Turn on the controller and press release e-stop to start the walking policy. There is no hardware low-voltage cutoff, so do not run it longer than 40 minutes.
Upstream stepgithub.com/HandsOnRobotics/pupper-v3-documentation/blob/c25c...
Wiring, power and firmware are safety-relevant and shown for reference only. Check them against the source before building.
metCAD / mesh presentReviewedThe docs' Fusion 360 link opens a public Autodesk share of the full Pupper v3.5 assembly with download enabled; a reviewer opened it. The docs' Onshape link could not be opened anonymously.20/20
Quality tier 3 of 3
Reviewed override, 2026-10-02
Evidence on a360.coEngine alone: partial at tier 2 (Onshape CAD linked, not inspected by the engine; no editable CAD source in the repo)
metBOM evidenceReviewedThe docs-linked Google Sheet (v3.5 tab) lists the parts with quantities, approximate line costs and buy or file links, and totals 2158.91 (min 1785.91) with no currency stated. The engine does not open Google Sheets.20/20
Quality tier 4 of 5
Reviewed override, 2026-10-02
Evidence on docs.google.comEngine alone: partial at tier 1 (BOM spreadsheet linked, not inspected by the engine)
partialWiring diagramwiring described in text only, no diagram7.5/15
Quality tier 1 of 3
metFirmware linkedcontrol software linked (software source Nate711/pupperv3-monorepo)10/10
Quality tier 2 of 3
metBuild instructionsReviewedThe build page embeds an 80-slide Google Slides guide with a photo for each step, from flashing the boards through the brain, body and legs. No build video. The engine does not open Google Slides.15/15
Quality tier 2 of 3
Reviewed override, 2026-10-02
Evidence on docs.google.comEngine alone: partial at tier 1 (build section in the docs, no step-by-step guide with images)
missingOSHW-compatible licenseno hardware license detected0/10
Quality tier 0 of 2
The engine found nothing to point at for this item.
missingKnown reproductionsno verified builds yet0/10
Quality tier 0 of 2
Only build reports a maintainer or admin has reviewed count here.
Engine v3.1.1 at c25c91d, 3 items reviewed by hand
- The engine found no license file for the hardware in the hardware source.
Files and sim
- pupperv3-monorepo/ros2_ws/src/pupper_v3_description/description/mujoco_xml/pupper_v3_complete.xml
- pupperv3-monorepo/ros2_ws/src/pupper_v3_description/description/pupper_v3.urdf.xacro
- pupperv3-monorepo/ros2_ws/src/neural_controller/src/neural_controller.cpp
- pupperv3-monorepo/ros2_ws/src/control_board_hardware_interface/src/control_board_hardware_interface.cpp
- pupper-v3-documentation/docs/guide/building.rst
- pupper-v3-documentation/docs/learn_more/tech_specs.rst
Files stay in the upstream repository under their own licenses; these links open them there. The 3D model on this page is Motari's conversion of the file named under Simulation.
Simulation
Robot description files a simulator or CAD tool can load, linked at the commit they were found.
- URDFros2_ws/src/pupper_v3_description/description/pupper_v3.urdf.xacroNate711/pupperv3-monorepo
- URDFros2_ws/src/pupper_v3_description/description/urdf/pupper_v3.edited.urdfNate711/pupperv3-monorepo
- URDFros2_ws/src/pupper_v3_description/description/urdf/pupper_v3.urdfNate711/pupperv3-monorepo
- MJCF (MuJoCo)ros2_ws/src/pupper_v3_description/description/mujoco_xml/pupper_v3_complete.xmlNate711/pupperv3-monorepo
The 3D specimen on this page is converted from ros2_ws/src/pupper_v3_description/description/mujoco_xml/pupper_v3_complete.xml at 6f96c5e, the project's simulation model in Nate711/pupperv3-monorepo, not its build CAD.
Builds
No reviewed builds of Stanford Pupper v3 yet.
A build log records the evidence (photos, a video, your repository), what the build cost, how long it took and what you changed. Each one is checked by Motari (until a maintainer claims this page) before it shows here, and reviewed builds count toward the reproducibility score.
Sources
Where the facts come from
- Documentationgithub.com/HandsOnRobotics/pupper-v3-documentationc25c91d
- Softwaregithub.com/Nate711/pupperv3-monorepo6f96c5e
- Simulationgithub.com/Nate711/pupperv3-monorepo/tree/main/ros2_ws/src/p...6f96c5e
- Bill of materialsdocs.google.com/spreadsheets/d/1e6Hyhc8V6_9mfPMaPCI1v3W4uGBJ...
- Build guidedocs.google.com/presentation/d/10pe-J3zd4QESnqR-5TIyVrtoOJ6w...
- Hardwarea360.co/4kD64eX
- Storepresent-perfection.com/product-page/pupper-v3-full-kit
Last push to HandsOnRobotics/pupper-v3-documentation: 2025-10-20 (checked 2026-10-02)
Related links
- Documentationpupper-v3-documentation.readthedocs.io
- Control board filesRev 3.5 Gerber, BOM and placement (Google Drive)
- Motor driver flashingGoogle Doc linked from the build page
How this page was made
Assembled from public sources on 2026-10-02, not yet reviewed by the maintainer. Each figure links to where it is stated; a value the sources do not state reads "not published". Last source review: 2026-10-02 HandsOnRobotics/pupper-v3-documentation@c25c91d, Nate711/pupperv3-monorepo@6f96c5e; BOM sheet v3.5 and build slides.
Original files stay intact and separately licensed; Motari adds only the summary on this page. Maintainer? Request a correction or removal.
Robots like Stanford Pupper v3
Lineage
- Supersedes
- Stanford Doggo
Shares parts with
Robots whose bill of materials names the same parts, most shared first. Each part links to every robot that uses it.
- JPL Open Source RoverRaspberry Pi89
- XLeRobotRaspberry Pi89
- AlohaMiniRaspberry Pi83
- UpkieRaspberry Pi83
- AndinoRaspberry Pi80
- Asimov 1Raspberry Pi80
Parts in this robot's BOM: Raspberry Pi (25 other robots)
Similar robots
The same type of robot, closest first by body plan, published cost and degrees of freedom. All legged robots



Badge for the README
Maintain Stanford Pupper v3? Show its reproducibility score in the project's README. The badge links back to this page and updates with the score.
%22%3E%0A%20%20%20%20%3Crect%20width%3D%22108%22%20height%3D%2220%22%20fill%3D%22%23555%22%2F%3E%0A%20%20%20%20%3Crect%20x%3D%22108%22%20width%3D%2249%22%20height%3D%2220%22%20fill%3D%22%23dbab09%22%2F%3E%0A%20%20%20%20%3Crect%20width%3D%22157%22%20height%3D%2220%22%20fill%3D%22url(%23s)%22%2F%3E%0A%20%20%3C%2Fg%3E%0A%20%20%3Cg%20fill%3D%22%23fff%22%20text-anchor%3D%22middle%22%20font-family%3D%22Verdana%2CGeneva%2CDejaVu%20Sans%2Csans-serif%22%20font-size%3D%22110%22%20text-rendering%3D%22geometricPrecision%22%3E%0A%20%20%20%20%3Ctext%20aria-hidden%3D%22true%22%20x%3D%22540%22%20y%3D%22150%22%20fill%3D%22%23010101%22%20fill-opacity%3D%22.3%22%20transform%3D%22scale(.1)%22%20textLength%3D%22980%22%3Ereproducibility%3C%2Ftext%3E%0A%20%20%20%20%3Ctext%20x%3D%22540%22%20y%3D%22140%22%20transform%3D%22scale(.1)%22%20textLength%3D%22980%22%3Ereproducibility%3C%2Ftext%3E%0A%20%20%20%20%3Ctext%20aria-hidden%3D%22true%22%20x%3D%221325%22%20y%3D%22150%22%20fill%3D%22%23010101%22%20fill-opacity%3D%22.3%22%20transform%3D%22scale(.1)%22%20textLength%3D%22390%22%3E73%2F100%3C%2Ftext%3E%0A%20%20%20%20%3Ctext%20x%3D%221325%22%20y%3D%22140%22%20transform%3D%22scale(.1)%22%20textLength%3D%22390%22%3E73%2F100%3C%2Ftext%3E%0A%20%20%3C%2Fg%3E%0A%20%20%3C%2Fa%3E%0A%3C%2Fsvg%3E)
[](https://motari.io/r/stanford-pupper-v3)<a href="https://motari.io/r/stanford-pupper-v3"><img src="https://motari.io/api/v1/badge/stanford-pupper-v3" alt="Motari reproducibility score for Stanford Pupper v3" height="20"></a>Not fully met yet: wiring diagram (partial), oshw-compatible license. The score is read from the project's own sources, so publishing what is missing is what raises it. A score of 90 or more needs a reviewed build. How the score is computed