
Asimov 1
Menlo Research's 1.2 m, 25-DoF open-source humanoid, sold as a DIY kit.
- $20,000Asimov 1 DIY Kit, unassembled (Batch 4); order with a 499 USD deposit; final price may vary by destination country based on tariffs and shipping, vendor kit
- 25 DoF
- CERN-OHL-S-2.0hardware
- 80 / 100 reproducibilityStrong source coverage, unverified
What it is
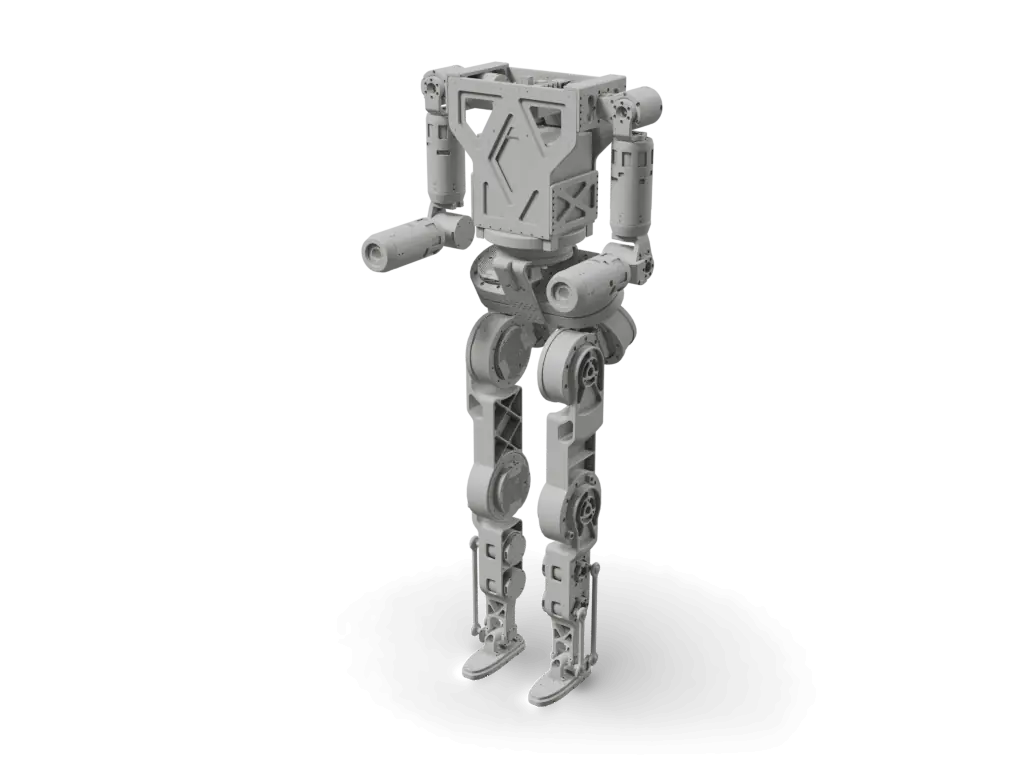
Asimov 1 is a 1.2 m, 35 kg bipedal humanoid from Menlo Research with 25 powered joints: 6 per leg (a parallel RSU ankle driven by two actuators), 5 per arm, a waist yaw and a 2-DoF neck, driven by five EC-A actuator models, a Radxa CM5 motion-control board, a Raspberry Pi 5 head computer and a 13S4P lithium-ion pack. The repository holds per-part STEP files for seven subassemblies (7075 aluminium, MJF PA12, 316L and off-the-shelf parts) with bearing, thread and heat-insert drawings, a full-body STEP assembly of about 369 MB stored in Git LFS, KiCad sources for the motion-control, power-distribution and Raspberry Pi HAT boards plus an EasyEDA Pro head board, cable lists, and a MuJoCo MJCF and URDF with 25 STL meshes in which the neck joints are fixed. Hardware is CERN-OHL-S-2.0 and software GPL-2.0, but the repo contains almost no software: firmware images are shared on request, locomotion training code is in menloresearch/cyclotron (BSD-3-Clause, formerly isaac_asimov), and the full BOM is gated behind a request form. Menlo's Python menlo-sdk (Apache-2.0, published on PyPI) drives the robot from a host computer. Menlo sells the unassembled DIY kit for $20,000 and estimates a 20-hour build, with a step-by-step manual on docs.menlo.ai. It succeeds the legs-only Asimov v0.
Licenses
- Hardware
- CERN-OHL-S-2.0
- Software
- GPL-2.0
- Docs
- Not published
Degrees of freedom
25 DoF arms 10legs 12neck 2waist 1
Bipedal humanoidParallel ankleFull bodysource
Auto-assembled, not yet reviewed
Source record
- Sources
- 1.2k stars, last push 2026-09-28
- HW license
- CERN-OHL-S-2.0
- Cost
- $20,000vendor kit, Asimov 1 DIY Kit, unassembled (Batch 4); order with a 499 USD deposit; final price may vary by destination country based on tariffs and shipping
- Lifecycle
- Active
- Engine
- v3.1.1
- Checked
- Model
- asimov_1.urdf@35ae7b3the project's simulation model in menloresearch/asimov-1, not its build CADrendered 2026-10-02
- Envelope
- 424 × 1254 × 257 mmas in the simulation model, default pose
Maintain Asimov 1? Claim this page to correct it.
Parts and cost
Cost to build
- Asimov 1 DIY Kit, unassembled (Batch 4); order with a 499 USD deposit; final price may vary by destination country based on tariffs and shipping
In the source currency, as read on 2026-09-30. Not converted, and not checked against current vendor prices: none of these is a Motari-verified checkout total.
Asimov 1 parts, as the source lists them. Prices are the source's, not checked against vendors.
| Part | Qty | Spec | Source | Confidence |
|---|---|---|---|---|
Asimov 1 DIY KitOfficial vendor kit, shipped unassembled; the full itemized BOM is only available through a request form | 1 | All BOM components, power supply and cabling, spare parts, edge, motion-control, network and power-distribution boards, camera, IMUs, mic, speaker; tools, hands, lidar, 360 camera and 4G/5G modules not included | Menlo Research$20,000 DIY kit price with a $499 deposit; final price may vary by destination countrymenlo.ai order page (Batch 4) and menloresearch/asimov-1 README.md lines 50 and 55-62 | high |
EC-A6416-P2-25 actuatorHip pitch (x2) and waist yaw | 3 | 40 Nm rated, 120 Nm peak | EC-A series; the asimov-v0 README names Encos as maker of these modelsincluded in DIY kit; separate price not listeddocs.menlo.ai Asimov 1 mechanical system tour, actuator table | high |
EC-A5013-H17-100 actuatorHip roll (x2) and shoulder pitch (x2) | 4 | 30 Nm rated, 90 Nm peak | EC-A series; the asimov-v0 README names Encos as maker of these modelsincluded in DIY kit; separate price not listeddocs.menlo.ai Asimov 1 mechanical system tour, actuator table | high |
EC-A3814-H14-107 actuatorHip yaw (x2) and shoulder yaw (x2) | 4 | 20 Nm rated, 60 Nm peak | EC-A series; the asimov-v0 README names Encos as maker of these modelsincluded in DIY kit; separate price not listeddocs.menlo.ai Asimov 1 mechanical system tour, actuator table | high |
EC-A4315-P2-36 actuatorKnee (x2) and shoulder roll (x2) | 4 | 25 Nm rated, 75 Nm peak | EC-A series; the asimov-v0 README names Encos as maker of these modelsincluded in DIY kit; separate price not listeddocs.menlo.ai Asimov 1 mechanical system tour, actuator table | high |
EC-A4310-P2-36 actuatorParallel-ankle A and B (x4), elbow (x2), wrist yaw (x2) and neck yaw/pitch (x2) | 10 | 12 Nm rated, 36 Nm peak; ankle A/B joint figures differ through the linkage | EC-A series; the asimov-v0 README names Encos as maker of these modelsincluded in DIY kit; separate price not listeddocs.menlo.ai Asimov 1 mechanical system tour, actuator table | high |
Robot Processing Unit (RPU)Radxa CM5 on the Menlo motion-control carrier board with a Power Distribution Board stacked above; KiCad sources in the repo | 1 | Radxa CM5; LSM6DSV IMU; 6 SPI-CAN ports, 2 USB 2.0, 1 Gbps Ethernet, I2C; XT90 (2+2) power input | Menlo design; Radxa CM5 moduleincluded in DIY kit; separate price not listedmenloresearch/asimov-1 electrical/README.md and docs.menlo.ai Asimov 1 electrical system tour | high |
Head Compute UnitMedia, networking and edge services computer in the head | 1 | Raspberry Pi 5 with Head Board (buck converters, audio IC) and Media HAT (button, LED, buzzer) | Raspberry Pi; Menlo boardsincluded in DIY kit; separate price not listedmenloresearch/asimov-1 electrical/README.md and docs.menlo.ai Asimov 1 electrical system tour | high |
Battery packLithium-ion pack with protection circuit module | 1 | 13S4P INR18650, 46.8 V nominal, 10.5 Ah typical, 491.4 Wh, about 2 kg | Menlo DIY kit contentsincluded in DIY kit; separate price not listeddocs.menlo.ai Asimov 1 electrical system tour, battery table | high |
Sensors and media setHead and torso sensing and audio | 1 | 2 MP monocular camera, 6-axis IMU, stereo microphone array, 10 W 4 ohm speaker | Menlo DIY kit contentsincluded in DIY kit; separate price not listedmenloresearch/asimov-1 README.md lines 32-33 and docs.menlo.ai Asimov 1 electrical system tour | high |
Actuator cable setPre-made XT30 (2+2) leads; some joins are soldered or WAGO-spliced after assembly | 32 | XT30 (2+2) female leads, 100 to 600 mm | Menlo DIY kit contentsincluded in DIY kit; separate price not listedmenloresearch/asimov-1 electrical/wiring/motor-wires.csv lines 2-33 | high |
Fabricated and off-the-shelf part filesPer-part STEP files across 7 subassemblies; per-part quantities are in the gated BOM, not in the repo | 1 | 43 7075 aluminium, 37 MJF PA12 and 18 316L part files plus 67 off-the-shelf part models | fabricate from repo STEP files or buy the DIY kitincluded in DIY kit; separate price not listedmenloresearch/asimov-1 mechanical/ASV1 tree at commit 35ae7b3 | high |
Rows from the source's own parts list 10
README.md@35ae7b3markdown
Asimov 1 mechanical system tour, actuator tablehtml
| Source row | Qty | Price and vendor | Line |
|---|---|---|---|
EC-A6416-P2-25 | 3 (counted from the per-ID actuator table on the same page) | vendor not listedno price listed | L31 |
EC-A5013-H17-100 | 4 (counted from the per-ID actuator table on the same page) | vendor not listedno price listed | L31 |
EC-A3814-H14-107 | 4 (counted from the per-ID actuator table on the same page) | vendor not listedno price listed | L31 |
EC-A4315-P2-36 | 4 (counted from the per-ID actuator table on the same page) | vendor not listedno price listed | L31 |
EC-A4310-P2-36 | 10 (counted from the per-ID actuator table on the same page) | vendor not listedno price listed | L31 |
| Source row | Qty | Price and vendor | Line |
|---|---|---|---|
Asimov 1 DIY Kit (Batch 4) | 1 | Menlo Research$20,000 | L1 |
How to build
Steps marked Motari summary condense the linked source; follow the source for exact instructions. Upstream step marks a step taken from the linked guide.
Sort the kit by module
Set out labelled trays for the left leg, right leg, pelvis, left arm, right arm, torso and head, keeping left and right parts apart, and check each module against the manual checklist before building.
Upstream stepdocs.menlo.ai/asimov/1/build/assembly-preparationsPrepare battery and electronics
Fit the battery into its enclosure with the charge port and switch, set up the Head Compute Unit and the RPU, then flash the Raspberry Pi 5 with Raspberry Pi Imager and the Radxa CM5 over USB-C in MaskROM mode, using images Menlo shares on request.
Motari summarydocs.menlo.ai/asimov/1/build/assembly-preparations/software-...Program actuator IDs
In Asimov Manager, connect one actuator at a time to the setup connector and write the ID from its sticker (1 to 25); never program with the harness connected. Menlo allows about an hour and a half.
Upstream stepdocs.menlo.ai/asimov/1/build/assembly-preparations/assign-ac...Assemble legs, pelvis, arms and torso
Build each leg (14 steps), the pelvis (9), each arm (14) and the torso with head, battery and covers (10), checking fit dry before applying threadlocker to bolts.
Motari summarydocs.menlo.ai/asimov/1/build/assembly-stepsFinish and check the assembly
Confirm both legs are on the pelvis, both arms on the torso, the head and RPU installed, covers secured, no cable trapped, and the battery connected to the RPU with the robot still powered off and supported.
Upstream stepdocs.menlo.ai/asimov/1/build/assembly-steps/finish-assemblyCalibrate actuators and first start
With the firmware stopped and the robot supported, run the Liveness Check so all 25 actuators answer without faults, record zero positions at the home pose, then continue to First Start.
Upstream stepdocs.menlo.ai/asimov/1/operate/setup/calibrate-actuators
Wiring, power and firmware are safety-relevant and shown for reference only. Check them against the source before building.
metCAD / mesh present166 editable CAD files (STEP), including an assembly + 25 mesh files20/20
partialBOM evidenceBOM on tally.so, not inspected by the engine10/20
Quality tier 1 of 5
metWiring diagramschematic or PCB source files (19 files, kicad_pcb/kicad_pro/kicad_sch)15/15
Quality tier 3 of 3
metFirmware linkedReviewedMenlo's own menlo-sdk (Apache-2.0, source on PyPI) drives Asimov 1 from a host computer: stand, walk, joints, camera and audio. Board firmware images are shared on request; cyclotron is a simulation training package.10/10
Quality tier 2 of 3
Reviewed override, 2026-10-02
Evidence on docs.menlo.aiEngine alone: missing at tier 0 (no firmware found)
metBuild instructionsReviewedThe docs manual has 75 numbered assembly steps over six modules, each with a parts table, written instructions and a 3D assembly view per instruction. No build video yet. The engine does not read docs.menlo.ai.15/15
Quality tier 2 of 3
Reviewed override, 2026-10-02
Evidence on docs.menlo.aiEngine alone: partial at tier 1 (build section in the docs, no step-by-step guide with images)
metOSHW-compatible licenseCERN-OHL-S-2.0 (from README license statement)10/10
Quality tier 2 of 2
- README.md35ae7b3
missingKnown reproductionsno verified builds yet0/10
Quality tier 0 of 2
Only build reports a maintainer or admin has reviewed count here.
Engine v3.1.1 at 35ae7b3, 2 items reviewed by hand
How this score is computedFiles and sim
- sim-model/xmls/asimov_1.xml
- sim-model/urdf/asimov_1.urdf
- sim-model/assets/meshes/WAIST_YAW.STL
- mechanical/ASV1/FullBodyAssembly/Asimov_1.STEP
- mechanical/ASV1/300/FABRICATION/ALU_7075/ASV1_300_01A.STEP
- mechanical/ASV1/100/FABRICATION/MJF_PA12/ASV1_100_01C.STEP
- mechanical/ASV1/Docs/ASV1_Bearings_Assembly.pdf
- mechanical/ASV1/Docs/Heat_Insert_parts/Heat_Insert_ASV1_100.pdf
- electrical/rpu/motion_control/board/board.kicad_sch
- electrical/rpu/motion_control/board/board.kicad_pcb
- electrical/rpu/power_distribution/board/board.kicad_pcb
- electrical/media/head/board/board.epro
- electrical/wiring/motor-wires.csv
- electrical/rpu/motion_control/mcb-io.dts
Files stay in the upstream repository under their own licenses; these links open them there. The 3D model on this page is Motari's conversion of the file named under Simulation.
Simulation
Robot description files a simulator or CAD tool can load, linked at the commit they were found.
- URDFsim-model/urdf/asimov_1.urdfmenloresearch/asimov-1
The 3D specimen on this page is converted from sim-model/urdf/asimov_1.urdf at 35ae7b3, the project's simulation model in menloresearch/asimov-1, not its build CAD.
Builds
No reviewed builds of Asimov 1 yet.
A build log records the evidence (photos, a video, your repository), what the build cost, how long it took and what you changed. Each one is checked by Motari (until a maintainer claims this page) before it shows here, and reviewed builds count toward the reproducibility score.
Sources
Where the facts come from
- Hardwaregithub.com/menloresearch/asimov-135ae7b3
- Simulationgithub.com/menloresearch/asimov-1/tree/35ae7b3581ce36762bfdd...35ae7b3
- Simulationgithub.com/menloresearch/cyclotronc50ff56
- Documentationdocs.menlo.ai/asimov/1
- Build guidedocs.menlo.ai/asimov/1/build/assembly-steps
- Bill of materialstally.so/r/jaG0va
- Storemenlo.ai/order
Last push to menloresearch/asimov-1: 2026-09-28 (checked 2026-10-02)
Related links
- Predecessor: Asimov v0 legsmenloresearch/asimov-v0
How this page was made
Assembled from public sources on 2026-09-30, not yet reviewed by the maintainer. Each figure links to where it is stated; a value the sources do not state reads "not published". Last source review: 2026-09-30 menloresearch/asimov-1@35ae7b3 README, HARDWARE-LICENSE.txt, SOFTWARE-LICENSE.txt, tree.
Original files stay intact and separately licensed; Motari adds only the summary on this page. Maintainer? Request a correction or removal.
Robots like Asimov 1
Shares parts with
Robots whose bill of materials names the same parts, most shared first. Each part links to every robot that uses it.
- JPL Open Source RoverRaspberry Pi89
- XLeRobotRaspberry Pi89
- AlohaMiniRaspberry Pi83
- UpkieRaspberry Pi83
- AndinoRaspberry Pi80
- LeKiwiRaspberry Pi80
Parts in this robot's BOM: Raspberry Pi (25 other robots)
Similar robots
The same type of robot, closest first by body plan, published cost and degrees of freedom. All humanoid robots


Badge for the README
Maintain Asimov 1? Show its reproducibility score in the project's README. The badge links back to this page and updates with the score.
%22%3E%0A%20%20%20%20%3Crect%20width%3D%22108%22%20height%3D%2220%22%20fill%3D%22%23555%22%2F%3E%0A%20%20%20%20%3Crect%20x%3D%22108%22%20width%3D%2249%22%20height%3D%2220%22%20fill%3D%22%232ea44f%22%2F%3E%0A%20%20%20%20%3Crect%20width%3D%22157%22%20height%3D%2220%22%20fill%3D%22url(%23s)%22%2F%3E%0A%20%20%3C%2Fg%3E%0A%20%20%3Cg%20fill%3D%22%23fff%22%20text-anchor%3D%22middle%22%20font-family%3D%22Verdana%2CGeneva%2CDejaVu%20Sans%2Csans-serif%22%20font-size%3D%22110%22%20text-rendering%3D%22geometricPrecision%22%3E%0A%20%20%20%20%3Ctext%20aria-hidden%3D%22true%22%20x%3D%22540%22%20y%3D%22150%22%20fill%3D%22%23010101%22%20fill-opacity%3D%22.3%22%20transform%3D%22scale(.1)%22%20textLength%3D%22980%22%3Ereproducibility%3C%2Ftext%3E%0A%20%20%20%20%3Ctext%20x%3D%22540%22%20y%3D%22140%22%20transform%3D%22scale(.1)%22%20textLength%3D%22980%22%3Ereproducibility%3C%2Ftext%3E%0A%20%20%20%20%3Ctext%20aria-hidden%3D%22true%22%20x%3D%221325%22%20y%3D%22150%22%20fill%3D%22%23010101%22%20fill-opacity%3D%22.3%22%20transform%3D%22scale(.1)%22%20textLength%3D%22390%22%3E80%2F100%3C%2Ftext%3E%0A%20%20%20%20%3Ctext%20x%3D%221325%22%20y%3D%22140%22%20transform%3D%22scale(.1)%22%20textLength%3D%22390%22%3E80%2F100%3C%2Ftext%3E%0A%20%20%3C%2Fg%3E%0A%20%20%3C%2Fa%3E%0A%3C%2Fsvg%3E)
[](https://motari.io/r/asimov-1)<a href="https://motari.io/r/asimov-1"><img src="https://motari.io/api/v1/badge/asimov-1" alt="Motari reproducibility score for Asimov 1" height="20"></a>Not fully met yet: bom evidence (partial). The score is read from the project's own sources, so publishing what is missing is what raises it. A score of 90 or more needs a reviewed build. How the score is computed