
Mini Pupper 2
MangDang's 12-DoF Raspberry Pi CM4 robot dog kit with serial bus servos and an ESP32-S3 board; open software, no published frame CAD or BOM.
- $604legs pre-assembled kit on the MangDang store, vendor kit
- 12 DoF
- No license filehardware
- 35 / 100 reproducibilitySparse source coverage, unverified
What it is
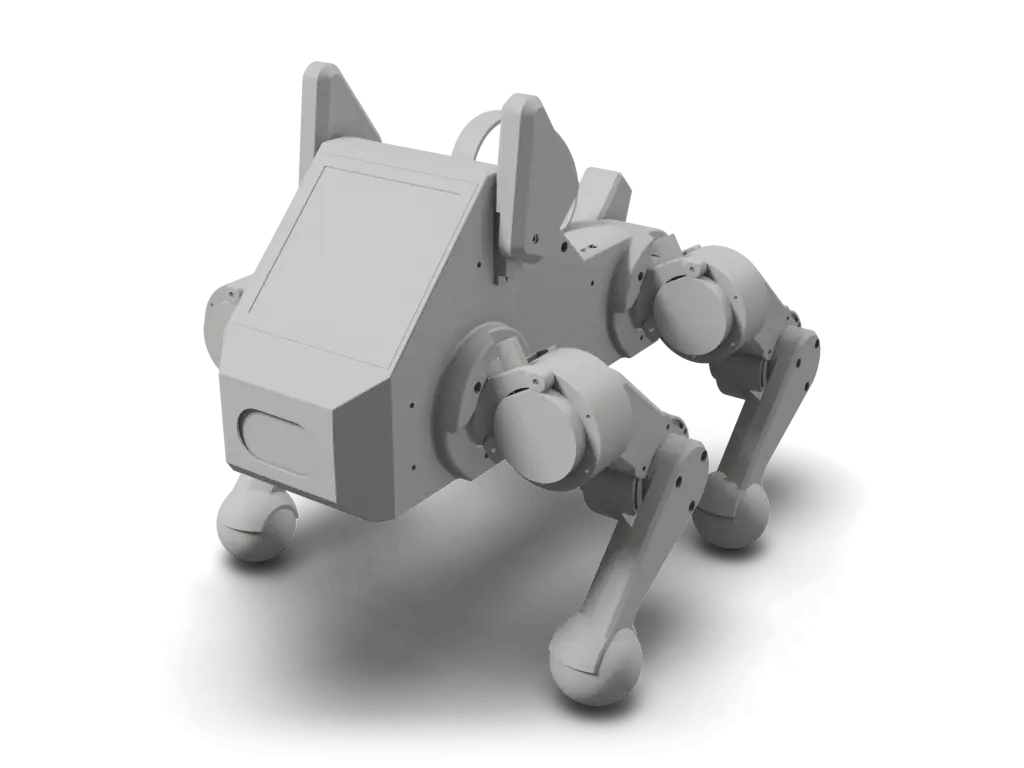
Mini Pupper 2 is MangDang's second palm-sized robot dog, launched in 2022 as the successor to Mini Pupper. MangDang's spec table gives it a Raspberry Pi CM4, serial bus servos with position feedback, an ESP32-S3 microcontroller, an IMU, touch sensors, a microphone and speaker, a 320x240 screen and a 1000 mAh battery, in a 209 x 109 x 145 mm, 465 g body. It is sold as a kit with pre-assembled legs (604 USD) or fully pre-assembled (649 USD). The open parts are software: the mini_pupper_2_bsp board support package (ESP32 firmware for the twelve servos, Python hardware interface, calibration) and the mini_pupper_ros packages, including a Mini Pupper 2 URDF, under Apache-2.0 apart from one GPL module in the BSP. MangDang also shares printable shell, foot and accessory STLs on Google Drive, but publishes no frame CAD, PCB design files or parts list for Mini Pupper 2, and no hardware license; the docs' BOM and Fusion 360 links are for the first Mini Pupper. The 3D view is the Mini Pupper 2 URDF from mini_pupper_ros, a simulation model.
Licenses
- Hardware
- No license file
- Software
- Apache-2.0
- Docs
- Not published
Degrees of freedom
12 DoF legs 12
Quadrupedsource
Auto-assembled, not yet reviewed
Source record
- Sources
- 14 stars, last push 2026-06-03
- HW license
- No license file
- Cost
- $604vendor kit, legs pre-assembled kit on the MangDang store
- Lifecycle
- Active
- Engine
- v3.1.1
- Checked
- Model
- mini_pupper_description.urdf.xacro@c3ad28cthe project's simulation model in mangdangroboticsclub/mini_pupper_ros, not its build CADrendered 2026-10-02
- Envelope
- 111 × 147 × 181 mmas in the simulation model, default pose
Maintain Mini Pupper 2? Claim this page to correct it.
Parts and cost
Cost to build
- legs pre-assembled kit on the MangDang store
- pre-assembled kit on the MangDang store
In the source currency, as read on 2026-10-02. Not converted, and not checked against current vendor prices: none of these is a Motari-verified checkout total.
Mini Pupper 2 parts, as the source lists them. Prices are the source's, not checked against vendors.
| Part | Qty | Spec | Source | Confidence |
|---|---|---|---|---|
Mini Pupper 2, Legs Pre-assembled KitMangDang sells Mini Pupper 2 as a kit; no parts list for sourcing the robot piece by piece is published | 1 | kit with pre-assembled legs (store variant L00); the store also sells a fully pre-assembled kit (F00) at $649.00 | MangDang store$604.00 on the MangDang store, checked 2026-10-02MangDang store, Mini Pupper 2 product page | high |
Rows from the source's own parts list 2
products/mp2html
| Source row | Qty | Price and vendor | Line |
|---|---|---|---|
Mini Pupper 2, Legs Pre-assembled Kit | 1 | mangdang.store$604.00 | L1 |
Mini Pupper 2, Pre-assembled Kit | 1 | mangdang.store$649.00 | L1 |
How to build
Steps marked Motari summary condense the linked source; follow the source for exact instructions. Upstream step marks a step taken from the linked guide.
Get the kit
Mini Pupper 2 is sold by MangDang as a kit, with the legs pre-assembled or fully pre-assembled; the docs publish no Mini Pupper 2 parts list for sourcing it piece by piece. Printable shell, foot and accessory parts are on the docs' Google Drive.
Motari summarymangdang.store/products/mp2Assemble the bottom plate
Connect the 4 legs to the bottom plate using the M2 x 5 mm screws.
Upstream stepgithub.com/mangdangroboticsclub/MiniPupperDocs/blob/5eb9f863...Fit the top PCB
Insert the four-legged connection wire into the top board and connect the LCD screen cable to the PCB board, paying attention to the direction. Pass the power line on the PCB board through the hole in the bottom plate, then fix the PCB board and bottom board using M2 x 5 mm screws.
Upstream stepgithub.com/mangdangroboticsclub/MiniPupperDocs/blob/5eb9f863...Fit the covers
Fit the side panels, then the shin guards with four M2x10 mm countersunk screws. For the shoulders, insert only the screws first, slide the shoulder parts into the gap, and tighten the screws with a 2 mm hex driver through the hole in each shoulder part. Put on the 4 shoes.
Upstream stepgithub.com/mangdangroboticsclub/MiniPupperDocs/blob/5eb9f863...Install the software
Flash the Ubuntu 22.04 preinstalled server image to the SD card, set your WiFi, update, then clone mini_pupper_2_bsp, run ./install.sh and reboot.
Upstream stepgithub.com/mangdangroboticsclub/mini_pupper_2_bsp/blob/7f740...Calibrate
Run the calibrate command installed by the BSP, then try the demos in its demos folder to confirm the installation.
Upstream stepgithub.com/mangdangroboticsclub/mini_pupper_2_bsp/blob/7f740...Power on and drive
Push the battery power button for at least 3 seconds to power on, put the controller into pairing mode (hold share and home until it double-flashes), wait for it to bind, and press L1 to activate the robot; R1 switches between rest and trot. The guide warns that powering the robot from an external supply above 8.4V will almost certainly fry all the servos.
Upstream stepgithub.com/mangdangroboticsclub/MiniPupperDocs/blob/5eb9f863...
Wiring, power and firmware are safety-relevant and shown for reference only. Check them against the source before building.
partialCAD / mesh presenthardware files on Google Drive, not inspected by the engine10/20
Quality tier 1 of 3
missingBOM evidenceno BOM found0/20
Quality tier 0 of 5
The engine found nothing to point at for this item.
missingWiring diagramno wiring diagram found0/15
Quality tier 0 of 3
The engine found nothing to point at for this item.
metFirmware linkedfirmware source in the repo10/10
metBuild instructionsReviewedThe Mini Pupper 2 assembly page gives written steps with a photo each for the kit (legs to the bottom plate, top PCB, covers) and a cover assembly video; legs and boards arrive pre-built. The engine does not open readthedocs.15/15
Quality tier 2 of 3
Reviewed override, 2026-10-02
Evidence on minipupperdocs.readthedocs.ioEngine alone: partial at tier 1 (external build guide linked, not inspected by the engine)
missingOSHW-compatible licenseno hardware license detected0/10
Quality tier 0 of 2
The engine found nothing to point at for this item.
missingKnown reproductionsno verified builds yet0/10
Quality tier 0 of 2
Only build reports a maintainer or admin has reviewed count here.
Engine v3.1.1 at 7f7401e, 1 item reviewed by hand
- The engine found no license file for the hardware in the hardware source.
Files and sim
- esp32/main/mini_pupper_servos.cpp
- esp32/main/mini_pupper_app.cpp
- esp32/CMakeLists.txt
- Python_Module/MangDang/mini_pupper/HardwareInterface.py
- install.sh
- mini_pupper_ros/mini_pupper_description/urdf/mini_pupper_2/mini_pupper_description.urdf.xacro
- mini_pupper_ros/mini_pupper_description/meshes/mini_pupper_2/base_link.stl
- mini_pupper_ros/mini_pupper_description/meshes/mini_pupper_2/Shell_Side.stl
Files stay in the upstream repository under their own licenses; these links open them there. The 3D model on this page is Motari's conversion of the file named under Simulation.
Simulation
Robot description files a simulator or CAD tool can load, linked at the commit they were found.
- URDFmini_pupper_description/urdf/mini_pupper_2/mini_pupper_description.urdf.xacromangdangroboticsclub/mini_pupper_ros
The 3D specimen on this page is converted from mini_pupper_description/urdf/mini_pupper_2/mini_pupper_description.urdf.xacro at c3ad28c, the project's simulation model in mangdangroboticsclub/mini_pupper_ros, not its build CAD.
Builds
No reviewed builds of Mini Pupper 2 yet.
A build log records the evidence (photos, a video, your repository), what the build cost, how long it took and what you changed. Each one is checked by Motari (until a maintainer claims this page) before it shows here, and reviewed builds count toward the reproducibility score.
Sources
Where the facts come from
- Softwaregithub.com/mangdangroboticsclub/mini_pupper_2_bsp7f7401e
- Softwaregithub.com/mangdangroboticsclub/mini_pupper_rosc3ad28c
- Simulationgithub.com/mangdangroboticsclub/mini_pupper_ros/tree/ros2-de...c3ad28c
- Build guideminipupperdocs.readthedocs.io/en/latest/guide/Assembly/MiniP...
- Hardwaredrive.google.com/drive/folders/1YyU4w-Ry1G25047BGe2m4Fi_TPRtYV0c
- Documentationminipupperdocs.readthedocs.io/en/latest
- Storemangdang.store/products/mp2
Last push to mangdangroboticsclub/mini_pupper_2_bsp: 2026-06-03 (checked 2026-10-02)
How this page was made
Assembled from public sources on 2026-10-02, not yet reviewed by the maintainer. Each figure links to where it is stated; a value the sources do not state reads "not published". Last source review: 2026-10-02 mangdangroboticsclub/mini_pupper_2_bsp@7f7401e, mini_pupper_ros@c3ad28c, MiniPupperDocs@5eb9f86; MangDang store.
Original files stay intact and separately licensed; Motari adds only the summary on this page. Maintainer? Request a correction or removal.
Robots like Mini Pupper 2
Lineage
- Supersedes
- Mini Pupper (MangDang)
None of the parts in this bill of materials is tracked across robots yet. See the parts robots have in common.
Similar robots
The same type of robot, closest first by body plan, published cost and degrees of freedom. All legged robots


Badge for the README
Maintain Mini Pupper 2? Show its reproducibility score in the project's README. The badge links back to this page and updates with the score.
%22%3E%0A%20%20%20%20%3Crect%20width%3D%22108%22%20height%3D%2220%22%20fill%3D%22%23555%22%2F%3E%0A%20%20%20%20%3Crect%20x%3D%22108%22%20width%3D%2249%22%20height%3D%2220%22%20fill%3D%22%23d73a49%22%2F%3E%0A%20%20%20%20%3Crect%20width%3D%22157%22%20height%3D%2220%22%20fill%3D%22url(%23s)%22%2F%3E%0A%20%20%3C%2Fg%3E%0A%20%20%3Cg%20fill%3D%22%23fff%22%20text-anchor%3D%22middle%22%20font-family%3D%22Verdana%2CGeneva%2CDejaVu%20Sans%2Csans-serif%22%20font-size%3D%22110%22%20text-rendering%3D%22geometricPrecision%22%3E%0A%20%20%20%20%3Ctext%20aria-hidden%3D%22true%22%20x%3D%22540%22%20y%3D%22150%22%20fill%3D%22%23010101%22%20fill-opacity%3D%22.3%22%20transform%3D%22scale(.1)%22%20textLength%3D%22980%22%3Ereproducibility%3C%2Ftext%3E%0A%20%20%20%20%3Ctext%20x%3D%22540%22%20y%3D%22140%22%20transform%3D%22scale(.1)%22%20textLength%3D%22980%22%3Ereproducibility%3C%2Ftext%3E%0A%20%20%20%20%3Ctext%20aria-hidden%3D%22true%22%20x%3D%221325%22%20y%3D%22150%22%20fill%3D%22%23010101%22%20fill-opacity%3D%22.3%22%20transform%3D%22scale(.1)%22%20textLength%3D%22390%22%3E35%2F100%3C%2Ftext%3E%0A%20%20%20%20%3Ctext%20x%3D%221325%22%20y%3D%22140%22%20transform%3D%22scale(.1)%22%20textLength%3D%22390%22%3E35%2F100%3C%2Ftext%3E%0A%20%20%3C%2Fg%3E%0A%20%20%3C%2Fa%3E%0A%3C%2Fsvg%3E)
[](https://motari.io/r/mini-pupper-2)<a href="https://motari.io/r/mini-pupper-2"><img src="https://motari.io/api/v1/badge/mini-pupper-2" alt="Motari reproducibility score for Mini Pupper 2" height="20"></a>Not fully met yet: cad / mesh present (partial), bom evidence, wiring diagram, oshw-compatible license. The score is read from the project's own sources, so publishing what is missing is what raises it. A score of 90 or more needs a reviewed build. How the score is computed